Tuesday, February 26, 2019

Make Your Own Plant Labels


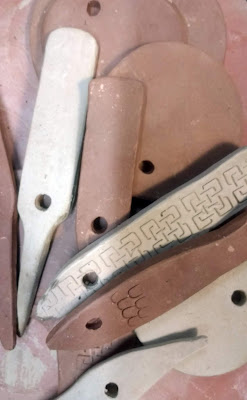
 Pre-glazed ceramic plant labels

How many times have you forgotten where you planted something or have rows and rows of mystery seedlings come up every year?

Those of us who don’t bother with planting plans start off with the best of intentions but generally forget what’s planted where. 

Labelling rows of seedlings is quite an important step in spring and some of us also like to put labels on almost anything else that grows. Not always because we want to be able to identify them but because labels can look pretty too.
Be it for decoration or necessity I have had a look at loads of different methods of label making, some fancier and more reliable than others. I’ll let you decide.

Plant Labelling Tips
Ask yourself a couple of questions before starting:

Would you prefer a decorative marker for a special plant that doubles as garden art?  Or like me just something functional and cheap? No fuss and no frills.

Do you need a temporary or permanent solution? Is the label only needed for the short term? (e.g. if you are raising seeds, using indoors or just one season)  Or would you want it to last long term? (e.g. multiple seasons, outdoors, or for a particular species in your garden) 

Decorative Labels
For indoor try laminating seed packets or design your own labels and put them on lolly sticks. Another good indoor idea is to paint the pots with blackboard paint and then chalk the plant names on these. You can change the names along with the plants if they are short lived.

Metal Spoons. These can be used to hold labels in the tines or you could flatten the bowl end and stamp the names of the plants on them with a letter punch.

Terracotta/Clay Pots and China. Sometimes pots and crockery break. This is a perfect opportunity to reuse and not discard the broken pieces. 

Plastic corrugated signs.  This is the material local politicians use to show their faces to the world come election time (estate agent s use them too) The white areas can be cut into strips and written on with an indelible marker before pushing into the ground.  Plastic containers, milk, ice cream lids, yogurt etc. can be cut into strips too and used in the same way.

Seed Packet and Jar. Secure used seed packets to lolly sticks, stick these in the ground and cover with a clear glass jar to weather proof, or just lock the labels in the jar. Like old carpets with nylon backing, glass is becoming very unpopular in the garden as the jars can easily break.

Bricks. For larger, easier-to-read plant labels that can’t be easily knocked over or broken use bricks — either intact or broken — work well as garden markers. Simply paint, let dry, and put into place.

Window Blinds. Just one accordion-style (Venetian) window blinds would be enough for a lifetime of plant labels. The individual pieces can be cut into stakes of varying lengths and labelled with the names of your growing veggies.

River Rocks & Beach Stones. For a natural look, collect smooth, medium-sized stones from rivers and beaches and label them with the names of your plants using weatherproof paint. Seal with a clear coat to avoid fading.

Wine Corks. Save wine corks and label them with permanent marker. Use wooden skewers as stakes for the corks.

Aluminium Duct Tape. This can be stuck onto most surfaces and written on, it will compress the tape and show the wording all year.

Ceramic Tiles. Use up old tiles to make weather-proof markers. Most tiling shops have a throw away bin with odds and ends. These can be painted or stencilled with plant names and pictures. I’m making some stoneware ones myself which I can glaze lettering onto.

Painted Wood. Reuse timber off cuts from fencing or joinery and use up leftover external paint to fashion some simple plant labels.

Twig Labels. Prune some straight twigs or thin branches. Use a vegetable peeler or sharp knife to slice a flat surface. As the wood will decompose in the weather, use it as a temporary label.

 Shell Labels. Save your shells after a walk on the lovely Inishowen beaches and add a little creative flair. Cover with a clear gloss after painting if you like.

Plastic knives. These will last for years too, the marker ink can be removed at the end of the season and the knife reused.

In my experience I find any label only lasts a year, regardless of the material it is. For some unexplained reason they always turn up the following year when I empty out the compost bin. I might be a bit enthusiastic come tidy up time.
Tuesday, February 19, 2019

Bittercress


An unwanted plant is making its mark all over my garden. It’s called bittercress and I first spotted it around two years ago in a small shaded area of the front garden. I didn’t pay much attention to it at first but then when seed pods started to pop on the long stems emanating from the rosette of ground hugging leaves, I knew I had a problem.

Bittercress
I’m still unclear which type of bittercress I have but it really doesn’t matter. The names are different but the growth habit of the plants are the same.  The two types I have narrowed it down to are Hairy Bittercress (Cardamine hirsute) and Wavy Bittercress (C. flexuosa) but it’s difficult to single them out.

Bittercress may be small and short-lived but its ability to produce and disperse large amounts of seed makes it an exacerbating weed. They are often introduced unwittingly on the compost of container plants from garden centres and planted in the ground unnoticed. I really don’t know where mine came from but it’s incidental really as these plants are everywhere and the seeds can jump huge distances when the pods pop and even further if they latch onto a prevailing wind. I am finding that it’s not just the seeds that are a problem, each leaf ridge has the capacity to root so if I don’t pull up every last piece of the plant it will come back again.

What is bittercress?

Hairy bittercres is an annual species, common throughout Ireland and the British Isles, particularly on bare ground, path-sides, and on walls. If you do see them in containers when buying plants make sure they don’t have seed heads and that you pull all of the roots out as they can regrow. These are the smaller of the two types growing just a few centimetres

Wavy bittercress is a biennial or perennial plant, common in moist shady places, such as by streams, throughout the Ireland and the British Isles. It may occasionally be troublesome in gardens, usually in moist or poorly drained soils.   These can grow strongly to reach around 50cm (18in) in height in damp conditions but is usually shorter in gardens.

Appearance
They are related to the pretty cuckoo flower (Cardamine pratense), but bittercress is a much drabber plant with small unnoticeable white flowers and pinnate leaves. The arrangement of flowers and seed heads is typical of members of the mustard family (Brassicaceae).

As the plants are frost hardy they can survive the winter and will flower as temperatures rise in early spring, producing several generations in a season. I am finding the bittercress self-set in pots in the tunnel are growing far faster than anything else and will set seed probably before anything else has produced a flower.

Non-chemical control
I wouldn’t be tempted to use chemicals against these plants as they love to set seed in bare patches of ground and chemical control loves making bare patches. So I’ll opt for the more labour intensive methods.

Cultural control is more successful if applied before the weed has had time to set seed. Where infestations of bittercress are light, fork out before the weed sets seed. Among ornamentals or vegetable crops, careful hoeing or hand weeding is the only practical means of destroying either weed. If, however, they have been allowed to seed, they may remain a recurring problem for some time.
On borders or bare soil, deep mulch (15cm (6in)) of organic matter such as garden compost or bark should help suppress the weed.  They are small and don’t really do too much damage in established gardens but I really wouldn’t like to be selling any plants to customers that have either the plant or the seed in the pots so for now every plant leaving my tunnel will be getting a change of soil and a root wash just to be sure.

Runner Up
Runner up to the bittercress for “Most invasive” plant in the garden has to be the tomatoes. Every chamomile plug I have has at least one tomato growing in it. I’d say I have a few thousand to tease out over the coming weeks. They do come out of the soil well though and it’s very relaxing to extract them from the soil and because the root is one long tap, it doesn’t damage the other plants.

Tuesday, February 12, 2019

Artificial Plants - Pros and Cons


You might think that artificial plants and flowers are just dust traps. They probably are but, then again everything in the home and office collects dust if it’s stationary for long enough.

Fake flowers are widely used in cemeteries on graves and you can often see a faded bunch of roses in windows of empty houses so they looked lived in. Older and cheaper types don’t have any UV protection so will fade quickly in a sunny window. 

Ignoring the stigma put on artificial plants and flowers there is a place for them in some houses and offices that either don’t have enough light or for people who don’t pay any attention to real plants to keep them alive. 

Like the natural world, artificial foliage comes in all shapes, colours and sizes – and quality. 

Replicating something that nature does so effortlessly is no mean feat as plants and trees are complex structures perfectly designed to carry out their purpose. It takes patience, planning and raw skill to create and when it’s done correctly; it is indistinguishable from the real thing unless you feel the leaves and petals.  I’m not favouring real or artificial here as there’s a place for both in some buildings (and gardens) it’s hard to say if a real plant stimulates the senses any more than an imitation one when you are walking through a shopping precinct or you catch a glimpse of one of the lovely range of artificial centrepiece orchids for sale. 

Pro’s and Con’s list for Artificial Plants
I’ve compiled a list of pros and cons regarding artificial plants. It’s proved to be quite a challenge as what one person will see as a bonus another could see as a negative. For example you now can't take real flowers into the hospital when visiting, so artificial ones can be used. That’s great for allergy sufferers but no so good for people who like to see a bit of nature.

Pro’s
They won't attract insects and if one does land on a flower they won’t stay long (Could also be in the con’s list)
They are non-toxic to pets
You can put them anywhere and are great for dark rooms or rooms with no windows.
Low/no maintenance
Great for allergy sufferers
Good for your pocket – yes they may cost more at the start that a real plant, but they will last a long time.
They won’t die from neglect. There is the common dilemma that everybody experiences when keeping living plants alive – when does it need to be watered? And how many times? Do I buy plant food? The only thing you need to think of is a duster, the only maintenance they will need in order to keep them looking fresh is the occasional wipe over with a soft damp cloth. An artificial plant will only start to look a little worse for wear with the accumulation of dust; looking after them means they retain their colour and overall look of freshness forever.
Maintenance is very easy .  They’re cleaner, artificial plants will not shed leaves or petals and there won’t be any water spillages that often occur when watering living plants. If an artificial plant is accidentally knocked over, there isn’t the issue of having to clean up any soil.
Temperature will not have any effect on artificial plants, and so they can be placed anywhere in any environment – in direct sunlight or cool areas – without the risk of them wilting.
 
Con’s
Some of the plants and flowers are made with plastic which can’t be recycled.
Just don’t have that “real” feel
Unlike real plants these don’t raise humidity in rooms (Could be in the Pro’s list)
They don’t reduce Co2 in the atmosphere (You’d need around 300 real plants in one room to make a lot of difference though)
Don’t prevent bacteria and mold
The con’s list is a lot shorter but a lot of people will probably find these a lot more important in the home and office.

Recycling
Plastic is popular which has its issues especially when it comes time to replace as not all of them biodegrade. Other materials like silk, wire, hemp, bamboo and papier-mâché are available and you can check the labels to see how well they can be recycled.
Feng Shui designers don’t really go with artificial plants and flowers and are seen as dust-catchers that represent dead, stale energy wouldn’t sit well with their designs in general, but I have seen the occasional artificial flower in a vase.

Tuesday, February 5, 2019

Checking CO2 Levels in the Home - and a bit at the end about hedging...


It’s getting cold.  January to early February is usually seen as the depth of winter and this year is no exception. Yes, the daylight is getting longer by a minute or two a day but that doesn’t make spring seem any closer. I’ve no complaints though as a nice cold spell works wonders on the garden, clearing up a lot of the old foliage after it’s turned to mush.

Checking CO2 Levels in the Home

There’s a tendency to keep the doors and windows tightly shut in this cold weather. A lot of houses are now really well insulated and with the addition of double glazing there’s very little chance for a good stream of fresh air to come into the house.  We recently bought a carbon dioxide (Co2) tester for the home as assess the parts per million in the rooms (ppm). Even with houseplants photosynthesising absorbing the Co2 and pumping out oxygen in the night time we saw the read out reach quite unacceptable levels in rooms where we spent a lot of time. 

Exposure to high levels of carbon dioxide can produce a variety of health effects. These may include headaches, dizziness, restlessness, a tingling or pins or needles feeling, difficulty breathing, sweating, tiredness, and increased heart rate and it’s very rarely tested for in homes unlike carbon monoxide. 
The levels weren’t high enough for concern though (up to 1700ppm) but the recommended healthy amount is but it is enough to get a bit drowsy or complain of stale air. 250/300 ppm is the usual outdoor range and the polytunnel confirmed this when the doors were open. Rotting vegetation can produces a lot of Co2 but as this is outside it soon dissipates into the air. Open fires can increase the levels though even with a through draft. 5000ppm is the maximum amount for a work environment but it wouldn’t be very safe, making you lose cognitive abilities such as reason and reflexes and that’s alarmingly the amount that can build up inside a motorbike helmet.

That’s shown me that forcing myself outside to do some work warms me up so when it’s time to go back indoors I don’t mind so much that I have had the windows opened for an hour or two a day.  I used to think the stale air feeling came from condensation but the “Sick Building Syndrome” a lot of us face in winter is a bit more complex than that. Open those windows folks.

Hedges
Many mixed hedges are pulled down to make way for fences and walls.  Hard barriers that are often made with treated wood or plastic. Building solid structures like these can also divide wildlife habitats and impede the flow of traffic for animals that may have traditionally crossed in the area. Freedom of movement is very important in nature.

There are two main hedging styles we can adopt for our own garden dividers that will offer privacy but allow for free movement. Formal hedging and mixed wildlife hedging are available, both of which absorb Co2.

Wildlife hedges
Not only will a mixed wildlife hedge provide habitat for birds, pollinators and others, but it also assumes the services that a regular fence would, like creating privacy, noise reduction, and defining the edge of a property. And for the lazy gardeners out there, it doesn't take much work once it's up and running. There are plenty of lists to choose from when it comes to deciding what’s best for a particular location. You’ll always be adding hawthorn though as that does well everywhere and the bees will thank you for it.

Planting Time
Plants sold without any soil on their roots, known as bare-rooted, could be planted during the dormant season only (November to March). These are my favourite option because of the low price and the success rate is far higher than container plants.

Container-grown hedging plants can be planted at any time of the year, except when the soil is frozen or waterlogged, but autumn is the ideal time for deciduous hedges because the soil is still warm enough to encourage some root growth before the onset of winter. This helps the hedging plants establish quickly so that they are more able to withstand any hot, dry spells the following summer. They can be very costly though and the bare root plants will soon catch up.

Formal hedge
There are a lot of formal hedge plants to choose from. I like the box hedge as its slow growing but I also have a soft spot for privet. Lavender, photinia, eleagnus, laurel and escallonia are all great choices depending on the location.

Ideally position boundary hedges so they are set back a little way (e.g. 90cm/3ft) from the boundary line. This will allow the hedge to fill out before it becomes an issue with overhanging the pavement or a neighbour's property.

Friday, February 1, 2019

Pickling Vegetables


Dill pickles go well with a cheese sarnie


January and February are seen to be the favourite time for us gardeners to browse the seed catalogues for this year’s crops. There is something very satisfying looking at the pretty pictures of healthy vegetables, then ordering far too many varieties to be able to grow without totally ignoring the spacing recommendations. Or is that just me?

There is an element of wishful thinking and forward planning though when ordering seeds and what better time to think about ordering a few vegetables that you will be able to use for pickling so you can enjoy the fruits of your labour all year around from the convenience of a glass jar. So not only could you look for particular pickle friendly varieties of your favourite veg, you can also start saving any glass jars with sealable lids that you find – You will need them.

Pickles
You can pickle most vegetables. Someone gave me a lovely jar of home grown pickled beetroot this week which got my thinking I should do my own again. I did make pickled onions and beetroot for a long time but eventually took to buying the mass produced ones from the shops as they were more convenient. They aren’t the same as your own home made ones though. Cheaper to buy than make maybe but you can’t put a price on the smug satisfaction you get knowing there are no artificial preservatives or added chemicals in the mix of your own produce.  So this year I’ll be doing at least a jar or two of onions.

Excellent pickles rely on high-quality, fresh ingredients. Producing your own means you can choose the very best produce and opens the door to exploring many different flavours and effects that can be achieved through spicing and fermentation.  Some say you can pickle almost any veg providing it is fresh and unblemished and others generally make their pickles from the oddments, mishapes and damaged crops  that won’t store well as they can be cleaned and chopped up so no-one is any the wiser.

Good pickling is about suspending veg at its peak in clear animation: to preserve and even boost its nutritional content. 

How long to keep your pickles before eating
Recipes vary enormously with some refrigerator or quick pickles being ready to eat within a day or two. Others, such as raw pickled onions, need six months or more to mature and delicacies like lime pickle can improve with years.

As a rough guide, veg sliced thinly or with a high water and sugar content requires less pickling time than those with more starch and larger proportions. Pickles matured for less time will generally be crunchier and punchier than those that have been left to mature, so a good rule is to go with what you like. Provided the pickles have been prepared and sealed carefully they will keep for a long time


You might only need around four or five cups so of cut vegetables to make enough jars to last the year.

Making the Pickles. An introduction

Salt Soak
The first step in making pickled vegetables is to soak them in salt or a strong saltwater solution for at least 3 hours, or sometimes overnight. Some moisture is drawn from the tissues, which helps to preserve crisp texture through the pickling process. Sea salt is preferred, then rinse the vegetables in cold water several times to remove excess salt when the soaking time is up. 

Vinegar Brine
The liquid in pickles is comprised of vinegar, sugar and sometimes water, along with subtle spicy flavours that give pickles their tanginess. You can use either clear distilled vinegar or amber-coloured malt or cider vinegar, depending on the results you want. 

Pickling Jars
After washing and removing the sticky label place the jars in an oven, you can get the herbs and spices ready for seasoning the pickles as the jars sterilize. There are all sorts of things you can use depending on your taste, garlic, dill, coriander, anything goes.

Sealing
There are methods to process the jars by placing them in hot water to seal them up. I’ve never done this so if you feel the need I would do a bit of research first.

Some Vegetables to Pickle
  • Radishes- any will do
  • Cucumbers - Small, firm-fleshed Kirby cucumbers work best here.
  • Carrots – Cut them up into ribbons so the vinegar soaks through them.
  • Red and white onions
  • Red Cabbage
  • Cauliflower – guaranteed to be crunchy
  • Green beans -pickled for an irresistible snack
  • Aubergine- Sliced thinly
As I mentioned, you could pickle almost anything so it’s a great opportunity to have a play when you have abundance.

More stories

Related Posts with Thumbnails