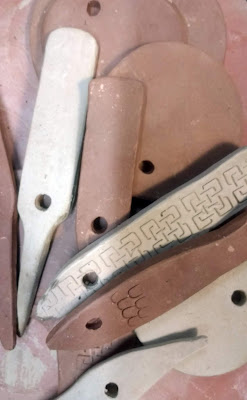
Pre-glazed ceramic plant labels
How many times have you forgotten where you planted something or have rows and rows of mystery seedlings come up every year?
Those
of us who don’t bother with planting plans start off with the best of
intentions but generally forget what’s planted where.
Labelling rows of
seedlings is quite an important step in spring and some of us also like to put
labels on almost anything else that grows. Not always because we want to be
able to identify them but because labels can look pretty too.
Be it for decoration or necessity I have had a look at loads
of different methods of label making, some fancier and more reliable than
others. I’ll let you decide.
Plant Labelling Tips
Ask yourself a couple of questions before starting:
Would you prefer a decorative marker for a special plant
that doubles as garden art? Or like me just
something functional and cheap? No fuss and no frills.
Do you need a temporary or permanent solution? Is the label
only needed for the short term? (e.g. if you are raising seeds, using indoors or
just one season) Or would you want it to
last long term? (e.g. multiple seasons, outdoors, or for a particular species
in your garden)
Decorative Labels
For indoor try laminating seed packets or design your own
labels and put them on lolly sticks. Another good indoor idea is to paint the
pots with blackboard paint and then chalk the plant names on these. You can
change the names along with the plants if they are short lived.
Metal Spoons. These
can be used to hold labels in the tines or you could flatten the bowl end and
stamp the names of the plants on them with a letter punch.
Terracotta/Clay Pots
and China. Sometimes pots and crockery break. This is a perfect opportunity
to reuse and not discard the broken pieces.
Plastic corrugated
signs. This is the material local
politicians use to show their faces to the world come election time (estate
agent s use them too) The white areas can be cut into strips and written on
with an indelible marker before pushing into the ground. Plastic containers, milk, ice cream lids,
yogurt etc. can be cut into strips too and used in the same way.
Seed Packet and Jar. Secure
used seed packets to lolly sticks, stick these in the ground and cover with a
clear glass jar to weather proof, or just lock the labels in the jar. Like old
carpets with nylon backing, glass is becoming very unpopular in the garden as
the jars can easily break.
Bricks. For
larger, easier-to-read plant labels that can’t be easily knocked over or broken
use bricks — either intact or broken — work well as garden markers. Simply
paint, let dry, and put into place.
Window Blinds. Just
one accordion-style (Venetian) window blinds would be enough for a lifetime of
plant labels. The individual pieces can be cut into stakes of varying lengths
and labelled with the names of your growing veggies.
River Rocks &
Beach Stones. For a natural look, collect smooth, medium-sized stones from
rivers and beaches and label them with the names of your plants using
weatherproof paint. Seal with a clear coat to avoid fading.
Wine Corks. Save
wine corks and label them with permanent marker. Use wooden skewers as stakes
for the corks.
Aluminium Duct Tape.
This can be stuck onto most surfaces and written on, it will compress the tape
and show the wording all year.
Ceramic Tiles. Use
up old tiles to make weather-proof markers. Most tiling shops have a throw away
bin with odds and ends. These can be painted or stencilled with plant names and
pictures. I’m making some stoneware ones myself which I can glaze lettering
onto.
Painted Wood.
Reuse timber off cuts from fencing or joinery and use up leftover external
paint to fashion some simple plant labels.
Twig Labels.
Prune some straight twigs or thin branches. Use a vegetable peeler or sharp
knife to slice a flat surface. As the wood will decompose in the weather, use
it as a temporary label.
Shell Labels. Save your shells after a
walk on the lovely Inishowen beaches and add a little creative flair. Cover
with a clear gloss after painting if you like.
Plastic knives. These
will last for years too, the marker ink can be removed at the end of the season
and the knife reused.
In my experience I find any label only lasts a year,
regardless of the material it is. For some unexplained reason they always turn
up the following year when I empty out the compost bin. I might be a bit
enthusiastic come tidy up time.
