Wednesday, October 31, 2012

Mushroom Foraging and Succesful Sunflowers


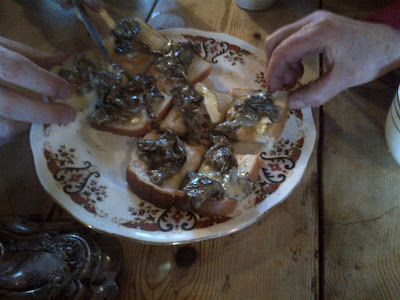
 Gareths mushrooms fried up on hot buttered toast...Yum

Foraging in the Woodlands
Gareth Austin, our own Radio Foyle gardener, community horticultural activist and Buncrana Tidy Towns Gardening competition judge, set up a mushroom forage around Prehen House in Derry recently. With the help of fungi expert Colin Peck, the small group gathered a wide range of fungi from the bold and beautiful to the strange and bizarre into baskets ready to be identified to see if they were edible varieties. 
The group had to be limited in numbers as their woodland autumn harvest was cooked up at the end of the day then spread on delicious hot buttered toast.  The positive comments and popularity of the day prompted Gareth to set another day to cater for the demand at the end  October, check out Gareth’s website   or facebook page to see if there are any more ‘Gatherings ‘ before the end of the season.  It’s a wonderful thing to have the knowledge and confidence to safely eat what comes out of the woods and it is recommended that you only eat mushrooms that you know are not poisonous. Having an expert team on hand as this course does save you any mishaps and visits to the poisons unit at the hospital. 

How to avoid mushroom poisoning
Shelley Evans' guidelines in "Guides for the Amateur Mycologist “have been helpful with this list.
1. Unfamiliar Species: Check and re-check your identification, especially looking out for a similar poisonous species. If still in doubt, ask an expert or throw it away.
2. Examine each specimen. Always check each specimen in case a different species has got in amongst your collection of edible ones.
3. Keep your collections separate. Do not mix edible and non-edible species in a collecting tray if you are collecting for the pot. It is a good idea if collecting for the pot to only collect edible species and not other species for identification purposes.
4. Check the spore print. A simple operation, leaving a cap on some paper and covering for an hour or so. This will help check your identification.
5. Do not eat raw wild fungi. Some wild fungi are poisonous if eaten raw, e.g. Wood Blewit, Lepista nuda, the Blusher, Amanita rubescens or species of Helvella. Always cook your collections.
6. Retain an uncooked specimen. This is a very sensible idea. Keep one example of what you have eaten in the fridge. In case, you do poison yourself, this will help others identify what you have eaten and therefore know how to treat you. Different species contain different toxins, therefore treatments will vary.
7. Only eat good specimens. Many poisoning cases occur when edible species are eaten in poor condition. Only eat good specimens!
8. Keep your collections in the fridge. This keeps your specimens in good condition.
9. Experimenting. If experimenting and eating a type for the first time, only eat a small amount. Different people react to fungi in different ways and it is safer to test your own body out gently!
10. Alcohol. Avoid drinking alcohol with species you haven't eaten before and with certain species, e.g. the Common Ink Cap, Coprinus atramentarius.
11. Fear. Do not feed wild mushrooms to people who don't want to eat them. Fear can make people sick.
12. Susceptible people. Do not serve wild fungi to young children, old or sick people. Their resistance may be lower.
13. Greed. Do not large quantities of wild mushrooms in one sitting. This alone can make you sick.
Remember : There’s not substitute for an expert by your side.

Successful Sunflowers
We had a very successful sunflower harvest this year.  They weren’t competition winners by any stretch of the imagination, only growing to about seven feet. But that means that the heads are full of plump seeds. The current world record for the tallest sunflower is just a touch over 26 feet, held by a bloke in Germany. Because our plants were quite compact and big headed we didn’t need to stake them and stood up on their own for most of the summer.  They have drooped a bit in their old age, but that’s to be expected when the heads mature and get top heavy.  

Get them first
We have grown a fair amount of sunflowers in the past and it’s usually the birds or fungal disease that gets to the seeds before we do so this year I was ahead of the game and cut them down just as the yellow petals dropped off.  Text books tell us to wait until the rear of the flower turns brown before chopping the stems off to about a foot in length, I find this is beyond the point of no return  as they just rot.  Mine are still green and lush so hanging them in a warm dry place should do the trick.  Another suggestion is leaving the flower heads on the plants and covering them with a paper bag to protect them from the birds. The recommendations are to change the bag ‘should it rain and get the bags wet’.  As I don’t want to change the bags 3 times I day, I’ll give that method a miss thank you.

The seeds are remarkably plump and well formed so I think this year will be a successful crop.  It’d be nice to have grown enough to produce my own sunflower oil but I’ll settle for a few seeds scattered on my porridge in the mornings.
Wednesday, October 24, 2012

National Conifer Week 2012


Take your eye off of them for just a season and specialist equipment might be needed.


I answered a classified ad on a local buy and sell website this week.  The ad was in the FREE section, and the person was looking for someone with a chainsaw to take away some trees.  It was worded as ‘FREE FIREWOOD’, which sounded good to me as we have a fire to keep going and my mother in law has two wood burning stoves to feed throughout the winter, so the more wood we can get the better.  As the garden was very local I took no time in getting there, with freebies it’s the early bird...

I needn’t have rushed though as the wood in question was on loads of multi stemmed conifers, still uncut and reaching 30-40 feet into the air.  I only have a small chainsaw and don’t have a trailer let alone a towbar on the car, so felt totally inadequate for the job.  I like to keep things tidy so even if I wasn’t getting paid I would still like to leave the place tidier than when I found it, so would feel compelled to take away all of the greenery, and there was plenty of it! I would have needed about twenty skips to clear the soft branches that would be no good for burning, even before I got to the trunks.  I asked the woman how the garden came to be so overgrown and she told me that she had planted all of the conifers (about 30 of them) in her garden and took her eye off them for a few years. This was the result.  The lady took me to a place where a hidden arbour was, totally covered by conifers, her patio, again swamped by them. I can only guess the damage they have done to the walls and driveway.  

This might be a bit of an extreme but I do know of a lot of people who are haunted by leylandii cutting every year, take your eye off them for a season and you have a mammoth clearing task on your hands. 
Garden retailers are not giving up though and still see the conifer as a must have for pots and containers at least, even if we are not prepared to let them lose in the garden.

Growing Conifers in the garden
To boost conifer sales, retailers have been getting involved in the National Conifer Week. The objective of this event, organised by the British Conifer Group (BCG) and supported by the Horticultural Trades Association (HTA), is to provide support for retailers to encourage their customers to see the many benefits of growing conifers in the garden.
Nearly a third of us have a conifer in the garden according to a recent survey.  It’s be interesting to see the amount of people who wished they never planted them in the garden in the first place as some types can grow up to 3 feet each growing season.

New Varieties to the market:
Even if conifers are advertised as being ‘dwarf’, keep a close eye on them!
Chamaecyparis lawsoniana ‘Pearly Swirls’,
Juniperus squamata ‘Hulsdonk Yellow’
and Juniperus squamata ‘Tropical Blue’.
These three offer vibrant colour to a garden in blues, greens, golds, greys and bronzes to brighten up those autumn and winter months.

Here are a few old favourites, ideal for the small garden
• Taxus baccata ‘Standishii’,
• Chamaecyparis obtusa ‘Nana Gracilis’
• Picea glauca ‘J.W. Daisy’s White’
• Picea pungens ‘Globosa’
• Chamaecyparis lawsoniana ‘Minima Aurea’.

Irish Stockist
Future Forests based in County Cork have a wide choice of both potted and bare rooted conifers. Bare rooted conifers will be in stock from November.
  • 3'x3'      Cryptomeria jap. 'Tilford Gold' . Dwarf bush, bronzed in winter
  • 8'x3'      Thuja occ 'Brabant'. Neat cone, bronze in winter
  • 5'x3'      Chamaecyparis laws. 'Yvonne'. Yellow /gold, cone shaped
  • 2'x2'      Chamaecyparis obtusa Nana Gracilis. Very dwarf, green shell shaped foliage
  • 8'x6'      Korean Fir (Abies koreana). Good shape and doesn't get too tall                              
      Purple cones on even a young tree
  • 5'x3'      Juniper communis Common Juniper. Strong bush, prickly, berries for gin                                              Native, likes lime
  • 3'x3'      Juniper squa. 'Holger'. New shoots tipped creamy yellow
If you can’t find what you are looking for locally then Future Forests is also offering any 5 Junipers in 9cm for 15 euro.

New Book
The RHS has recently published a giant, two-volume Encyclopedia of Conifers, co-authored by Derek Spicer, which covers all of the world’s 615 conifer species plus 8,000 cultivars. An ideal book for the conifer collector, the encyclopedia features over 5,000 fantastic photos and provides an essential reference tool.

Be Warned
As part of the ‘Plan it, Plant it this Autumn' campaign, conifers can offer a way to add something new and interesting to the garden at has become a quieter time in the trade. Being hardy, easy to care for and long-lasting, conifers are the ideal choice for the marginal gardener looking for a low maintenance but high impact plant.
Be warned though, what looks cute and unobtrusive now could reach 40’ in height and have a spread of more than 25 feet!


Thursday, October 18, 2012

There's No Substitute


Strimmer Dilemma
The grass has been neglected for the best part of the summer and needed cutting.  It’s not because I like it tidy; it’s more that we were losing the ability to see dog mess- and garden tools. So I ventured out on this sunny autumn morning to tackle it with my trusty strimmer.  It’s not a large area of green, so it wasn’t going to take me too long and I could get back to other outdoor pursuits like chopping wood and cutting back the brambles. 

It took only a minute to strap on my harness, fill the tank with the petrol and oil mix, and pull the rip cord, kicking the two stroke engine into life.  Not bad seeing as the machine has been sitting in the garage all summer.  There were two chewed up pieces of strimmer cord attached to the head, which were left over from the last outing so I needed to replace these as the engine warmed up.  The head I have on the strimmer uses two six inch pieces of cut plastic cord, which needs to be pushed into the sides and kept in place by serrated discs. It sounds a bit complicated but it’s the same as giving my dog a ball then trying to take it out of its mouth.  You just can’t.  I searched around the garage and could only find three pieces of cord, which is about 30 pieces less than I need to tackle the grass, but I carried on regardless.  

Make it last
I used the first two really quickly, sometimes you can be lucky and the cord lasts a good while, but if it hits concrete of a bit of steel netting it snaps straight away.  I was left with just one bit of cord and seeing as I took the time and trouble to put on the safety clothing, goggles and boots, I wasn’t going to give up easily. And as I only had a small area to do I didn’t think it was necessary to get changed and go to the shop to buy some. I had to find an alternative

Looking around the garage I spotted a few things that I thought might double up as an alternative to the plastic cord.  I eliminated things like nails and metal coat hangers cut to size as these could prove fatal to me or anyone nearby if they dislodged from the heads as they spin around at 5000 rev per minute.  I even dismissed using cut pieces of brake cables from my lad’s bike. I would need to replace those and that would be more expensive than going to the hardware shop and buying new cord, defeating the objective of me making do and mending.

Make do and Mend, if it’s safe
I did find a couple of things that I thought would work.  I had some cable ties, yes good old cable ties, only second to Duck Tape as being the ‘Fix it’ thing you can’t live without in the home.  These didn’t work, after a few seconds attacking a clump of tough grass they just disintegrated.  I then tried stripping some heavy duty electrical cable and using the grey plastic bit that holds the three wires together.  This soon snapped and flew into the neighbour’s garden, the wire from the cable was next and those are still embedded in the fence, it was stiffer than I thought.

There was nothing else for it, after an hour of rummaging around trying to find something that could withstand the rigours of rough tufts of grass I resorted to the one piece of cord I had left in my pocket. I pushed it into the head and gingerly started to slice through the grass. I was so careful in keeping the revs down and making sure that I didn’t hit anything solid.  After ten minutes I achieved the impossible. What would normally have taken 30 pieces of cord I did with just the one six inch piece. It just goes to show what can be achieved with a bit of patience. 

 I missed something though.  I didn’t bother taking down the clean washing that was hanging up on the line.  I also wasn’t as thorough as I thought picking up the dog mess and unfortunately large blobs of it was sent at high velocity all over the clean towels.  Another load of boil washing to do in the washing machine then its back into the garage for the strimmer until next year. I might remember to buy some cord before then. I have found out at my cost that there is no substitute for the real thing.

Thursday, October 11, 2012

Planning for Winter


The missed beans will be planted out next year.


Our vegetable patch is looking a bit sorry for itself at the moment.  Like most years the runner beans seem to just shrivel up in the cold wind and those that I missed have produced the most lovely beans which I might keep over to plant out next year.  The courgettes have turned to liquid goo ready for the slugs and snails to suck up.  The peas that we didn’t see to harvest have turned into bullets and the mange tout are so stringy you could make rope out of the fibre, the dog is enjoying them though.  There are some vegetables that are only just starting to come into their own and will hopefully see the winter out and be the first crops we will be harvesting in early spring.  We haven’t got a lot to overwinter as this is our first year of growing in the new place, but out of them all its broccoli that come out on top for me because harvesting it indicates the start of a new growing year. I like the taste too.

Most vegetable gardens can accommodate winter crops and a bit of planning now will mean more self sufficiency in spring. Some vegetables, such as Brussels sprouts, take up a lot of space for a long time but are still well-worth the investment. 

Planting
Choose an open site with free-draining soil as the winters can waterlog even the driest spots. Mulch or lightly cultivate prior to sowing or planting and enriched with organic material.


Our dog is enjoying the stringy mange tout more than me.


You could also try planting a few veggies in containers; less greedy feeders will do well. Planting potatoes in late summer should get you a basket full for the Christmas dinner. If a greenhouse or polytunnel is available, it can be used to over-winter some crops and start others off early. However, heating greenhouses for year round harvests is rarely efficient. I remember the staff at the Organic Centre in Rossinver telling me that a polythene tunnel will grow all year round without the need for heat; it’s just picking the right plants to grow that is important. It’s probably more important for commercial growers to do this; I like the idea of giving the soil a bit of a rest sometimes.  

What to grow for winter
 Good disease resistant crops could be broccoli, Brussels sprouts, cabbages, kale, leeks and parsnips These are all hardy vegetables and will stand through the winter. Leafy crops such as chard, parsley and rocket should also over-winter with a little protection. Other crops such as carrots, onions, turnips and winter squash can also be grown to enjoy in winter if stored , which is an art in itself.

When to sow vegetables for winter harvests

Spring and summer
Sow hardy winter vegetables such as sprouting broccoli, Brussels sprouts, kale, winter cabbage and leeks in late spring or early summer as they take several months to reach maturity. They stand well through frosty weather and can be harvested throughout the winter months.
Sow leafy crops such as chard, chicory and parsley in early summer for autumn harvests that can last into winter if they are provided with some fleece or cloche protection.
Late summer and autumn
Sow corn salad, land cress and oriental salad leaves such as komatsuna, mibuna, mizuna, mustard and rocket. These will provide cut-and-come-again leaves through the autumn, and winter if covered with a cloche, coldframe or fleece. It’s also a good time to be sowing green manures such as clover or rye..  They are not edible crops but useful for fixing nitrogen for next year and help to stop soil erosion

Growing tips for a Winter Harvest
It takes a little planning to have enough vegetables for winter and I haven’t managed it in 30 years!  We don’t give up though..I have enlisted the help of the RHS for some tips and advice.

·         Sow brassicas and leeks into a seedbed outside or into seed trays, cell trays or pots indoors
·         Sow parsnips direct into the ground and be aware they may take several weeks to germinate
·         Harden off seedlings raised in the greenhouse thoroughly before planting them outside
·         Transplant seedlings to their final positions when they have formed small, sturdy plants with two or four pairs of true leaves (in the case of leeks, when they are pencil thick)
·         Sow salad plants direct into the ground in summer in shallow drills that have been watered prior to sowing
·         In summer, use space wisely by sowing or transplanting seedlings into ground vacated by early crops, such as broad beans or early potatoes
·         Keep plants well-watered
·         Hoe between rows regularly to keep them free of weeds
·         Cover salads and leafy plants with cloches for protection before the frosts

Problems
As with any vegetable growing, there are a number of things that can go wrong, and I should know!
·         Some leafy crops are prone to bolting if they experience stress
·         Cabbages will need protection from caterpillars
·         Broccoli, Brussels sprouts and cabbages are prone to club root
·         Flea beetles are a common problem on oriental salad leaves
·         Winter vegetables are often attacked by pigeons and will need the protection of netting from autumn onwards
·         Slugs and snails are a major pest of seedlings and leafy crops
·         Poor quality Brussels sprouts can be due to a range of cultivation problems
·         Root vegetables are prone to splitting when heavy rains follow drought
·         Cabbage whitefly can infest all brassicas, but may be tolerated or treated with a range of sprays.

You might be tempted to think that it’d be easier to go to the shops (or the growing array of local organic market stalls setting up around the peninsula... You’d be right!

But it’s not all about being easy is it?


More stories

Related Posts with Thumbnails